Saturday 30 March 2013

Rye, cider and oat bread

Although beer is not my favourite alcoholic beverage, I was so tempted to try this legendary P.Hollywood's ultimate ploughman's loaf with rye, ale and oats. He says this is a historic British bread with modern twist. I had to do more twisting as I replaced ale with cider. My friend Catherine twisted the recipe even further by replacing rye with granary flour and ale with apple juice. The result of her bread looked stunning. :) 
Though I couldn't taste it, I'm sure it tasted great as I trust her judgement.
Anyway, here is my "Rye, cider and oat bread" packed with flavour. I really enjoyed the nuttiness of rye, subtle sweetness of treacle and fruity flavour of cider. The crust gives a distinctive character to this bread.   
This is a perfect loaf for a ploughman's lunch of chutney, apple and celery slices, and your favourite cheese.
I enjoyed this bread with camembert cheese and chillie jam. :) 

Ingredients
For the loaf 
  • 350g (12oz) rye flour 
  • 150g (5½oz) strong white flour, plus extra for flouring
  • 10g (¼oz) salt
  • 10g (¼oz) instant yeast
  •  50ml (2fl oz) black treacle
  • approx 140ml (4¾fl oz) water (I used 120ml for my loaf)
  • approx 250ml (9fl oz) cider (I used 220ml for my loaf)


For the cider batter topping 
  • 150ml (5fl oz) cider
  • 100g (3½oz) rye flour
  • pinch of sugar
  • handful of jumbo oats


Method
1.   Mix the flour, salt and yeast in a bowl. Add the treacle, 100ml (3½fl oz) of the water and 150ml (5fl oz) of the cider. Using your hands, stir the ingredients together until all the flour leaves the side of the bowl. Gradually add the remaining cider and water if needed (I only added 20ml of water and 70ml of cider)- the dough should be soft and all the sides of the bowl should be clean.
2.   Tip the dough onto a lightly floured surface and knead for 5-10 minutes. The dough will be wet initially but will become smooth once worked. When the dough has a smooth skin put it into a lightly oiled bowl. Cover with a clean cloth and leave for two hours.
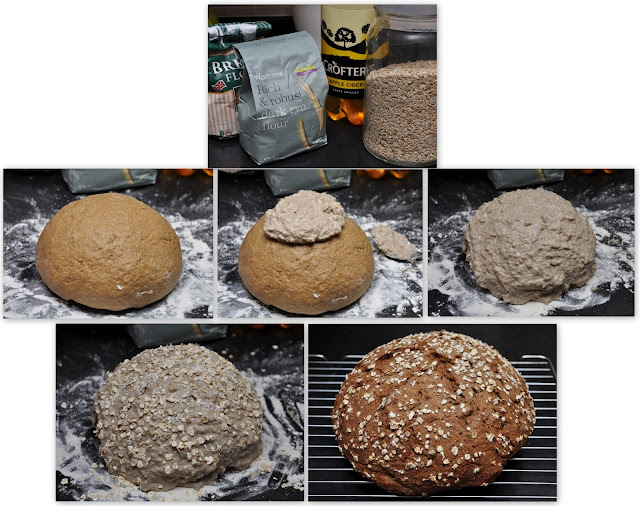


3.   For the topping, mix the cider with the rye flour and a pinch of sugar to form a thick batter.
4.   Tip the dough out onto a floured surface and shape into a ball. Spread the cider paste over the loaf and sprinkle over the jumbo oats. Place the loaf onto a baking tray lined with parchment.           Leave to prove for one and a half hours.
5.   Preheat the oven to 220C (425F / Gas 7).
6.   Bake for 25 minutes. Reduce the oven temperature to 200C (400F / Gas 6) and bake for a further 10 minutes. The loaf will be golden-brown and should sound hollow when tapped on the base. Leave to cool on a wire rack.


Friday 29 March 2013

Overnight Sponge and Dough Method part 2


As I mentioned in my previous post about "Overnight Sponge and Dough Method Bread", I changed the ratio of flour and water here. The new formula is much easier to handle than the previous one.
I used wholemeal flour for the 2nd stage of 175g flour. the bread tasted great with a thin crust and very soft and moist crumb. However, there were a few big bubbles inside. Perhaps I couldn't knock all the air out before shaping the loaf.  Well, it's a learning curve. :)

Ingredients
For the sponge
  • 200ml warm water (about 30-35C)
  • 1 level tsp easy-blend yeast (it may also be called "fast-action dried yeast", "instant yeast")
  • 175g strong white bread flour

For the dough
  • 175g strong white bread flour (or other kind of flour e.g. wholemeal, rye etc.) 
  • 1 level tsp fine salt
  • 10ml olive oil

Method
  1. In a big mixing bowl add the warm water and stir in the yeast.  Add the flour, stir it up well with a wooden spoon, cover the bowl and leave overnight.
  2. When you're ready to make your dough, put the second batch of flour (175g) into the yeast batter.  Add salt and olive oil, then mix well.
  3. Lightly flour the work surface and knead the dough for 10 minutes, then cover and leave in a warm place until the dough has doubled in height (2-3 hours).
  4. When the dough is ready, knock it back (pushing it away from the sides with your knuckles) and tip it onto a work surface.
  5. Mould the dough into rugby ball shapes and place them on a baking tray. Cover with a clean tea towel and leave to prove (30 mins - 1 hour). Dust the top of the loaf with a little more flour and slash the top with a sharp knife if you want.
  6. Heat oven to 220C/ fan 200C/ gas 7.
  7. Pour hot water onto the bottom of the oven or into a dish at the bottom of the oven to create steam. 
  8. Bake the bread for 20 mins, then reduce the heat to 190C /fan 170C/gas 5 and continue to bake for 30 mins until the loaf sounds hollow when removed from the oven and tapped on the base. Leave the bread on a wire rack to cool completely

Wednesday 27 March 2013

Overnight sponge and dough method bread


Recently, I came across a method called "overnight sponge dough." 
I thought that it would be a quicker version of sourdough. Is that right? 
Wikipedia says, "The sponge and dough method is a two-step bread making process: in the first step a sponge is made and allowed to ferment for a period of time, and in the second step the sponge is added to the final dough's ingredients, creating the total formula."  Hmmm....Fascinating stuff. 
So, why this method? "The sponge method is used for 3 different reasons: taste, texture and chemistry.  
The flavour that is created is dependent on the ingredients used and the fermenting yeast. Just like sourdough, the longer the ferment, the greater the taste difference."
So, I thought to myself, why not try this. I did further research and created my recipe.  It was a really sticky job as the dough was wet and difficult to work with.   However, I was happy with the result.   
The bread had a very fine structure, was silky smooth and had a slightly sour flavour compared to the normal bread I make (click here to see) but was much milder than sourdough bread. It also had a very thin crust and a soft and moist interior. I should say there are some issues to deal with like the balance of the quantity of water and flour.  My friend Catherine used 190g flour at the 2nd stage which is a bit more flour than the original recipe. She did really well on her amended version. It's the matter of the ratio of flour and water after all.  Anyway, I've got an idea to make this "Sponge and Dough method bread" easier. I mean to create a dough which is easier to handle.   I'll post the new recipe, so watch this space. 
Meanwhile, here are the ingredients and the method I used for my first sponge and dough method bread.   

Ingredients
For the sponge
  • 225ml warm water (about 30-35C)
  • 1 level tsp easy-blend yeast
  • 175g strong white bread flour

For the dough
  • 175g strong white bread flour
  • 1 level tsp fine salt
  • 25g olive oil

Method
  1. In a big mixing bowl add the warm water and stir in the yeast.  Add the flour, stir it up well with a wooden spoon, cover the bowl and leave overnight.
  2. When you're ready to make your dough, put the second batch of flour (175g) into the yeast batter.  Add salt and olive oil, then mix well.
  3. Lightly flour the work surface and knead the dough for 10 minutes, then cover and leave in a warm place until the dough has doubled in height (about 2 hours).
  4. When the dough is ready, knock it back (pushing it away from the sides with your knuckles) and tip it onto a work surface.
  5. Mould the dough into rugby ball shapes and place them on a baking tray. Cover with a clean tea towel and leave to prove for 30 mins. Dust the top of the loaf with a little more flour and slash the top with a sharp knife if you want.
  6. Heat oven to 220C/ fan 200C/ gas 7.
  7. Pour hot water onto the bottom of the oven or into a dish at the bottom of the oven to create steam. 
  8. Bake the bread for 15 mins, then reduce the heat to 190C /fan 170C/gas 5 and continue to bake for 30 mins until the loaf sounds hollow when removed from the oven and tapped on the base. Leave the bread on a wire rack to cool completely


Tuesday 5 March 2013

something called "Lemon Bars"


I really enjoyed my bargain lemons and there were the last two remaining in the fruit bowl. 
I was wondering if there was any unusual recipe for my last two lemons and came across something called "lemon bars." Sounds very American to me as we may call these "lemon slices" here in Britain. 
Anyway, these are slices of very tangy lemon filling on top of a biscuit base. That's more or less what they are.  Tray-baked lemon tart ... something like that.  I added lemon zest to the filling to get even more lemony flavour. 

Ingredients

  • 225 g butter, softened 
  • 100 g caster sugar
  • 250 g plain flour
  • 4 eggs
  • 300 g caster sugar
  • 30 g plain flour
  • zest and juice of 2 lemons

Method

  1. Preheat oven to 175 C.
  2. In a medium bowl, blend together softened butter, 250g flour and 100g sugar. Press into the bottom of a 9x13 inch pan.
  3. Bake for 15 to 20 minutes in a preheated oven, or until firm and golden. 
  4. In another bowl, whisk together the remaining 300g sugar and 30g flour. Whisk in the eggs, lemon zest and lemon juice. Pour over the baked crust.
  5. Bake for an additional 20 minutes in the preheated oven. The bars will firm up as they cool. 
  6. Cut into squares when cooled.  


Saturday 2 March 2013

Really Tangy Upside-down Lemon Cake


I can't resist a bargain .... A bag of unwaxed lemons was half price ... I had to buy them. 
So here is the incredibly tangy upside-down lemon cake with two whole lemons. 
Yes, truly two whole lemons. I used lemon zest in the cake mixture and sliced the lemons and placed them in the bottom of the cake tin which was layered with caramel sauce. 
I love lemon, but it was seriously tangy.   However, somehow, it was quite morish and I really enjoyed it. Should I recommend you to bake it?     
I'm not so sure ... but if you REALLY like a tangy lemony flavour, go for it. 

Ingredients 

  • 200g plain flour
  • 150g sugar 
  • 2 tsp baking powder
  • 150ml milk
  • 50ml vegetable oil  
  • 1 egg
  • zest of 2 lemons
  • 2 sliced lemons
  • for caramel: 3 oz caster sugar + 3 tablespoon water
Method

  1. Place the granulated sugar and 6 Tbsp water into a stainless steel pan.
  2. Stir over a low heat until the sugar has dissolved and there are no granules.
  3. Remove the spoon and increase the heat. (Do NOT stir! Just watch!)
  4. Boil until a golden straw colour and immediately pour into the cake tin. Leave it to cool.
  5. Slice the lemons and place them on top of the caramel layer in the bottom of the cake tin.
  6. Measure out the dry ingredients in a large mixing bowl. Add lemon zest.
  7. Measure milk and oil in a large measuring jug. Add egg and whisk well.
  8. Add the wet mixture into the dry mixture.  Stir until just combined. 
  9. Pour the mixture into the cake tin.
  10. Bake in a preheated (180 C) oven for 20 minutes or until golden brown on top. 
  11. When the cake is baked, leave it for a few minutes then turn it upside-down onto the plate.