Friday 30 November 2012

5 and 6 strand plaited loaves

Plaited loaves are so pretty, aren't they? And so impressive. I'm ok with 3 plaits as I can plait my hair quite easily. But braiding bread dough with more than 4 strands is a challenge.
Here is my attempt to make five and six strand plaited loaves. I actually tried an 8 strand plaited loaf as well, but I couldn't make the shape which I expected. So, I'm not quite ready yet to post the 8 strand plaited loaf in this blog.  But, work is in progress. :) 
All the loaves of bread were made with my basic loaf recipe.

5 Strand Plaited Loaf
Let's start the with 5 plait loaf. I found very clear instructions for a 5 strand plaited loaf.
It wasn't as complicated as I thought. I think it was because I got very good instructions ..... without it, it could have been a mess. However, as you can see the shape changed when it was baked ... hmmmm....
... not quite perfect yet.


Next is the 6 stranded plaited loaf.
6 Strand Plaited Loaf
Ah, this looks so much better, doesn't it?  Thanks to the very good instruction video I found on youtube. (see below)  It tasted as good as it looks and was good fun to make. :)
Now, an 8 Strand plaited loaf is the next challenge.


Tuesday 27 November 2012

Ginger Cupcakes

Somehow..... I like to eat warm gingerbread with a very milky cup of tea on a cold day. 
Well, these cupcakes are not in the shape of a gingerbread cake, but they are moist and spicy with all the goodness of gingerbread cake, but in a lovely little cupcake shape. I decorated them with lemon icing.  
They would be really nice with chopped apples, raisins or stem-ginger in the batter.  Yum. :) 

Ingredients  (8 cupcakes)

  • 140g low-fat margarine
  • 100g dark brown mascovado Sugar
  • 70g caster sugar 
  • 40g golden syrup
  • 1 large egg, beaten
  • 1 Tbsp milk
  • 200g plain flour 
  • 2 tsp baking powder
  • 2 teaspoon ground ginger
  • 1 teaspoon ground cinnamon
Method
1.     Preheat oven to 180 °C.
2.     Melt the margarine, sugar and golden syrup in a bowl in a microwave.
3.     Sieve the flour, baking powder, ginger and cinnamon into a mixing bowl.
4.     Stir in the milk, beaten egg and cooled liquid mixture.
5.     Mix everything together gently and then pour the mixture into the muffin cases.
6.     Bake in a preheated oven for 20 to 25 minutes.


Here are my "apple ginger cupcakes."
I grated 1 apple and mixed them into the wet mixture before adding the dry mixture.
This time, I decorated them with lemon and ginger icing.  (icing sugar + ground ginger + lemon juice)

They really are very moist.  :)

Thursday 22 November 2012

Apple and Almond Cake

To be honest, I'm not a great fan of almonds, but I love the flavour of almond in cake. 
So, here is my almond cake but this is not a kind of almond cake which doesn't require flour at all. 
It's an upside down cake. :)   It's beautiful when it is turned out because the bottom of the cake shows a pretty pattern of sliced apples .... Of course, if you laid the apples beautifully that is ...  :)
I made glaze with marmalade and lemon juice to give a shine to the cake.  

Ingredients 

  • 180g butter, at room temperature, (or low-fat spread) 
  • 140g caster sugar
  • 1 tsp vanilla extract
  • 3 eggs, at room temperature
  • 100g ground almonds
  • 150g self-raising flour (or plain flower with 1 tsp baking powder) 
  • 50ml to 80ml milk 
  • 2 small Royal Gala apples, quartered, cored & thinly sliced  


Method
1.  Preheat the oven to 170 C / Gas mark 3. Brush around 22cm (base measurement) cake tin with melted butter to grease. Line base and side with baking parchment.

2.  Beat butter, caster sugar & vanilla in a bowl for 8 mins or till pale and creamy (by hand or electric beater). Add the eggs, 1 at a time, beating well after each addition.

3.  Stir in ground almonds. Add half the flour and half the milk. Use a wooden spoon to stir until well combined. Repeat remaining flour and milk.

4.  Arrange the apple, slightly overlapping, over the base of the prepared tin. Spoon mixture into the tin and smooth the surface.

5.  Bake in the oven for 30-35 mins or until a skewer inserted into the centre comes out clean.

6.  Set aside in the pan for 10 mins to cool slightly before turning onto a serving plate. 


Sunday 18 November 2012

Vanilla Cupcakes with Low-fat Butter Cream Icing

I was searching for a low-fat butter cream icing recipe .... and I couldn't find one .... 
I know it's a bit silly to look for  low-fat "butter cream" as the whole point of using butter is the "full-fat", isn't it?   There were some recipes that use baking margarine or low-fat spread to make a butter cream substitute. However, I heard that the "margarine cream icing" has never tasted good. 
Well, in that case, I thought to myself, why not use a small amount of butter to keep some flavour of butter and add something to reduce the total amount of fat.   So, I made butter and crème fraiche icing. This was my first attempt and I loved it.   My cream keeps the lovely butter flavour and yet is very fluffy and light.    It has a slightly cream cheese flavour which is a great.  I made this cream with 50g butter and 100g crème fraiche.   I like the soft and light texture, but it is a bit messy to eat.   So, for good solid piping, I would recommend 50g butter and 50g crème fraiche. Then you can add crème fraiche little by little until the texture becomes how you like it. 


Ingredients (for 7-8 muffins) 

  • 110g/4oz butter or margarine, softened at room temperature
  • 110g/4oz caster sugar
  • 2 free-range eggs, (I used learge eggs) lightly beaten
  • 1 tsp vanilla extract
  • 110g/4oz self-raising flour 
  • 1 tbsp milk (optional) 
  For low-fat buttercream icing
  • 50g butter, softened
  • 200g icing sugar
  • 50g-100g half-fat crème fraiche
  • a few drops of food colouring and vanilla extract

Method

  1. Preheat the oven to 180C/350F/Gas 4 and line a  muffin tin with paper cases. 
  2. Cream the butter and sugar together in a bowl until pale. Beat in the eggs a little at a time and stir in the vanilla extract.
  3. Fold in the flour using a large metal spoon, adding a little milk to make a dropping consistency if needed. Spoon the mixture into the paper cases until they are half full.
  4. Bake in the oven for 15-20 minutes, or until golden-brown on top and a skewer inserted into one of the cakes comes out clean. Set aside to cool for 10 minutes, then remove from the tin and cool on a wire rack.
  5. For the butter cream icing, beat the butter in a large bowl until soft. Add half the icing sugar and beat until smooth.
  6. Then add the remaining icing sugar with crème fraiche, adding more crème fraiche if necessary, until the mixture is smooth and creamy.
  7. Add the food colouring and vanilla extract and mix until well combined.
  8. Spoon the icing into a piping bag with a star nozzle and pipe the icing using a spiralling motion onto the cup cakes in a large swirl.


Thursday 15 November 2012

good old Choux a la Creme


Little Choux buns filled with custard cream bring back memories of my childhood.
We Japanese people call them シュークリーム, "Choux a la Creme Anglaise." They were very popular pastries in those days and I believe they still are.  My mum never made them but bought them quite often from the bakery. As a little girl at that time, I adored the little crusty buns filled with thick creamy eggy custard. I never knew that British people eat "hot" custard until I came to England and it was a bit of a culture shock. Custard had been always thick and cold and never ever hot and runny in my mind. So, I asked my English friend what on earth was that yellow liquid. Anyway, here are my simple Choux a la Creme. I enjoy making choux pastry. It's fun to see the constancy of the dough dramatically change in the saucepan.
I made low-fat custard cream this time. Making home-made custard is also a joy. Stirring the custard continuously until gradually the liquid turns to "proper" custard is a kind of therapy I think. I added a bit of orange zest at the end to make citrus infused custard.


Ingredients for choux buns 
( I made 20 of these, but you could make 30 small ones) 

  • 60g ( 2½ oz) strong flour
  • 150ml cold water
  • 50g (2 oz) butter
  • 2 large eggs


Method

  1. As you are going to need to 'shoot' it quickly into the water and melted butter, sift the flour into a bowl and add a teaspoon of caster sugar and pinch of salt and set aside.
  2. Put 150ml of cold water in a medium-sized saucepan together with 50g of butter, cut into small pieces, then place the saucepan over a moderate heat and stir with a wooden spoon. As soon as the butter has melted and the mixture comes to the boil, turn off the heat immediately, as too much boiling will evaporate some of the water.
  3. Then tip the flour in – all in one go – with one hand, while you beat the mixture vigorously with the other. You can do this with a wooden spoon.
  4. Beat until you have a smooth ball of paste that has left the sides of the saucepan clean – this will probably take less than a minute.
  5. Beat 2 large eggs well, then beat them into the mixture – a little at a time, mixing each addition in thoroughly before adding the next.
  6. Beat until you have a smooth glossy paste. At this stage, lightly grease a baking sheet then hold it under cold running water for a few seconds, and tap it sharply to get rid of excess moisture. This will help create a steamier atmosphere, which, in turn, helps the pastry to rise.
  7. Fill a plain-nozzle piping bag with the choux dough and pipe the dough into small buns about 5cm/2in in diameter onto the baking tray, leaving at least an inch between each buns.
  8. bake on a high shelf in a pre-heated oven – gas mark 6, 400°F (200°C) – for 10 minutes. After that, increase the heat to gas mark 7, 425°F (220°C), and bake for a further 15-20 minutes until the buns are crisp, light and a rich golden colour.
  9. Pierce the side of each one to let out the steam. Put the pastries back in the oven for a few minutes to completely dry out.  Then cool them on a wire rack. 


Ingredients for Low-fat Custard cream 


  • 2 Tbsp plain flour
  • 410ml milk
  • 1 dash vanilla extract
  • 2 large eggs
  • 56g sugar

Method
  1. Whisk flour and half of milk in a medium sauce pan until smooth. Whisk in the remaining half of the milk and add vanilla extract.
  2. .Bring the mixture to boil over medium heat, stirring constantly, then reduce heat to low, cook for 1 minute or until sauce thickens.
  3. In a small bowl, whisk together eggs and sugar. While beating constantly, add a little bit of milk mixture to the bowl to temper the eggs. Then add the egg into the milk mixture.
  4. Cook over low heat, stirring constantly for 5 minutes or until sauce thickens. Strain through a sieve into a clean bowl.
  5. Store in air tight container in the fridge for up to 2 days.


Tuesday 13 November 2012

Very Yellow 3 egg yolk Cake


I was planning to make some macaroons with 3 egg whites. 
Obviously there would be 3 leftover egg yolks.  I thought to myself, what could I do with the leftover egg yolks?  Making mayonnaise, extra rich pastry, carbonara spaghetti, etc. ... but I wanted to make a cake.  
So I searched to find out if there was any recipe which only uses egg yolk because I didn't want to waste the leftover egg yolks. Then, I came across the cake called "yellow cake" which doesn't require egg white at all. I amended the recipe for my 3 egg yolks and created a recipe for a very yellow lemon cake. 
I also added zest of an orange to the batter to make citrus flavoured cake. Then, I made lemon syrup with fresh lemon juice and sugar, and poured the juice over the cake when it was still warm in the cake tin.  
The resulting cake was unexpectedly good, very moist and yet light and fluffy in texture.  
Ironically, I spectacularly failed to make macaroons. Everything went so wrong and it was absolutely disastrous.  So I ended up wasting the precious ingredients of the macaroons as most of them were badly stuck to the baking paper and I couldn't remove them.
Well, I have to admit that I was defeated by macaroons, but I was rescued by this leftover cake. 
However, I won't give up making macaroons. So watch this space. :)

Ingredients
  • 150g  plain flour
  • 1.5 tsp baking powder
  • ¼ tsp salt
  • 85g butter (or low-fat spread)
  • 130g sugar
  • 3 egg yolks
  • 120ml milk
  • 1 tsp vanilla essence
Method
  1. Preheat the oven to 180 C (350 degrees F).
  2. In a bowl sift or whisk the flour with the baking powder and salt.
  3. In the bowl of your electric mixer, or with a hand mixer, beat the butter until soft and creamy (about 1-2 minutes).  Gradually add the sugar and beat until light and fluffy (about 3-5 minutes).  Add egg yolks, in two batches, beating well after each addition. Add the vanilla extract and beat until combined.
  4. With the mixer on low speed, alternately add the flour mixture (in three additions), and milk (in two additions), beginning and ending with the flour.  
  5. Pour the mixture into the cake tin. Bake 22 to 28 minutes or until a toothpick inserted into the centre of the cake just comes out clean and the cake springs back when pressed lightly in the centre.  

Sunday 11 November 2012

low-fat Tarte au Citron


I have been searching for a low-fat lemon tart recipe for quite sometime. Then, I found a "relatively" low-fat recipe for my favourite lemon tart from the BBC GoodFood website
I amended the recipe for my convenience. As you see in my version below, there is no waste of egg yolk or egg white. I sometimes get annoyed when I come across a recipe that has lots of egg white or egg yoke left over.   This is a very tangy, incredibly lemony tart. I love a lemony flavour, so it suits me very well. :) 


Ingredients 
For pastry
  • 50g butter , cut in pieces
  • 140g plain flour
  • 1 tbsp icing sugar
  • 1 tbsp vegetable oil
  • 1 egg yolk
For filling
  • 3 eggs , plus 1 egg white
  • 140g icing sugar , plus extra for dusting
  • 2 tbsp finely grated lemon zest (about 3 lemons)
  • 125ml lemon juice (from 3 lemons plus bottled lemon juice)
  • 200ml tub half-fat crème fraîche

Method
  1. Rub the butter into the flour until the mix looks like fine breadcrumbs. Stir in the icing sugar, then make a well and use a round-bladed knife to stir in the oil, egg yolk and 1½-2 tbsp cold water until the dough comes together. Without overhandling, gather into a ball. On a lightly floured surface, roll out so it fits a 23 x 2cm loose-bottom flan tin. Ease the pastry into the tin, then trim the edges by rolling the rolling pin over the top. Press the pastry into the flutes so it sits very slightly proud of the edge (this extra height helps in case of any shrinkage). Lightly prick the pastry base with a fork, then chill for about 10 mins. Heat the oven to 190C / 170C fan / gas 5.
  2. Meanwhile, make the filling. Beat the eggs and egg whites together with a wooden spoon until well mixed. Sift the icing sugar into a bowl, then gradually beat in the eggs. If the mix is at all lumpy, simply beat with a wire whisk. Stir in the lemon zest and the juice. Leave to stand so the lemon flavour can develop.
  3. Sit the chilled pastry case on a baking sheet. Line with baking parchment and baking beans and bake blind for 15 mins until well set. Carefully lift out the beans and paper, then bake the pastry case for another 3-5 mins until the base is cooked and pale golden. (I pre-baked the pastry without using baking parchment and baking beans for 15 minutes). 
  4. Strain the lemon mixture through a sieve. Beat the crème fraîche in a medium bowl until smooth, then slowly stir in the lemon mix until well blended. Transfer to a jug, then carefully pour two thirds into the warm pastry case. Place in the oven with the oven shelf half out, pour in the rest of the filling, then carefully slide the shelf back in. Reduce the heat to 150C/130C fan/gas 2. Bake for 25-30 mins until barely set with a slight wobble in the middle. Cool for about 1 hr, then serve with a light dusting of icing sugar. Best eaten the same day.


Wednesday 7 November 2012

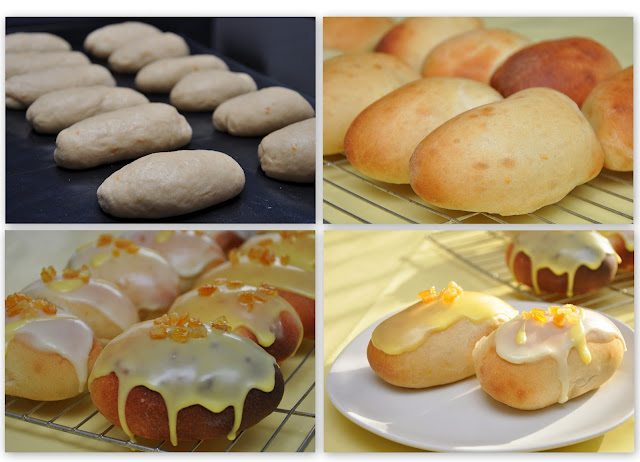
Lemon Iced "Chubby" Fingers

Here is another way of presenting rich sweet dough ... very wet and sticky dough .... 
... and it was quite difficult to shape the dough into "fingers." 
As you see they are more "chubby fingers" than they really should have been, but they tasted good.... 
So, it's all good, isn't it? 

 Ingredients

  • 255g strong white flour
  • 250g plain flour
  • 125ml warm water
  • 125m warm milk
  • 1 x 7g sachet fact-action dried yeast
  • 1 tsp fine sea salt
  • 50g caster sugar
  • the zest of 1 lemon or orange
  • 1 free-range egg, beaten
  • 50g butter, cut into cubes
  • For icing 
    • 50g icing sugar
    • ½ lemon, juice 
Method

1.     Place the flour, water, milk, yeast, salt, sugar and lemon (or orange) zest into a large bowl and mix. 
Add the beaten egg and butter and continue to mix until the mixture comes together as a sticky dough.

2.    Tip the dough onto a lightly floured work surface and knead for ten minutes, or until the dough is smooth and elastic.

3.    Lightly oil a bowl with a little of the vegetable oil.

4.    Place the dough into the bowl and turn it until it is covered in the oil.  Cover the bowl with cling film and set aside in a warm place for one hour, or until the dough has doubled in size.

5.    Lightly grease two baking trays.

6.    Knock the dough back to its original size and turn it out onto a lightly floured work surface.  Divide the dough into twelve portions, shape them into long oval and place onto the baking trays. Ensure the buns are well spaced. Cover with a tea towel and set aside to prove for 30 minutes.

7.    Preheat the oven to 220C/425F/Gas 7.

8.    Bake the buns in the oven for 10-15 minutes or until well risen and golden-brown.  Remove the buns from the oven and set aside to cool on a wire rack.

9.    Meanwhile for the icing, mix the icing sugar and lemon juice (and food colouring if you like) together in a bowl until smooth.

10.  Once the buns have completely cooled, spread the icing on top of them and set aside until the icing has hardened. Decorate with orange/lemon peal.  


Sunday 4 November 2012

Apple tart tatin with rough puff pastry

I have been baking a lot of upside-down cakes recently with some burnt caramel.... it's a bit tricky to make  caramel "just right." The difference in cooking time between undone caramel and burnt caramel is literally seconds. Anyway, here is another attempt to make caramel. This time, I made tart tatin with rough puff pastry. The caramel turned out almost right. :)

I found Mary Berry's technique, which grates butter and lard with a cheese grater very useful. Both butter and lard should be ice cold to do a good grating job in order not to melt the fat. I put the butter and lard in the freezer for a while before using it. I followed Mary's apple tart tatin recipe for this.
Just came out of the oven                           Upside-down... hurray


Baked as a dessert for the dinner party 16.11.2012
Success. :)