Saturday, 30 March 2013

Rye, cider and oat bread

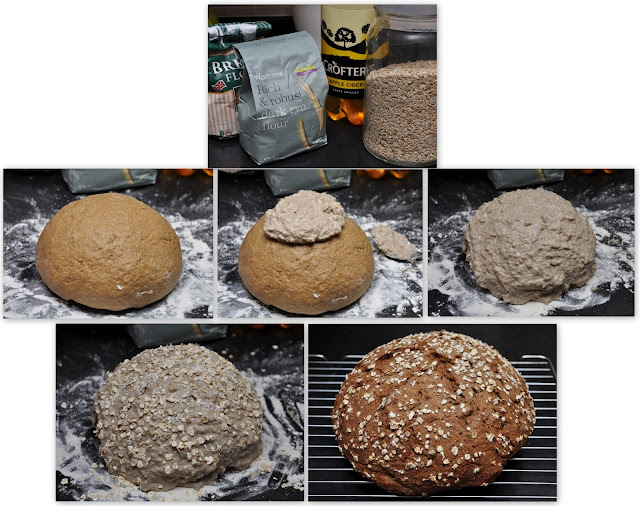
Although beer is not my favourite alcoholic beverage, I was so tempted to try this legendary P.Hollywood's ultimate ploughman's loaf with rye, ale and oats. He says this is a historic British bread with modern twist. I had to do more twisting as I replaced ale with cider. My friend Catherine twisted the recipe even further by replacing rye with granary flour and ale with apple juice. The result of her bread looked stunning. :) 
Though I couldn't taste it, I'm sure it tasted great as I trust her judgement.
Anyway, here is my "Rye, cider and oat bread" packed with flavour. I really enjoyed the nuttiness of rye, subtle sweetness of treacle and fruity flavour of cider. The crust gives a distinctive character to this bread.   
This is a perfect loaf for a ploughman's lunch of chutney, apple and celery slices, and your favourite cheese.
I enjoyed this bread with camembert cheese and chillie jam. :) 

Ingredients
For the loaf 
  • 350g (12oz) rye flour 
  • 150g (5½oz) strong white flour, plus extra for flouring
  • 10g (¼oz) salt
  • 10g (¼oz) instant yeast
  •  50ml (2fl oz) black treacle
  • approx 140ml (4¾fl oz) water (I used 120ml for my loaf)
  • approx 250ml (9fl oz) cider (I used 220ml for my loaf)


For the cider batter topping 
  • 150ml (5fl oz) cider
  • 100g (3½oz) rye flour
  • pinch of sugar
  • handful of jumbo oats


Method
1.   Mix the flour, salt and yeast in a bowl. Add the treacle, 100ml (3½fl oz) of the water and 150ml (5fl oz) of the cider. Using your hands, stir the ingredients together until all the flour leaves the side of the bowl. Gradually add the remaining cider and water if needed (I only added 20ml of water and 70ml of cider)- the dough should be soft and all the sides of the bowl should be clean.
2.   Tip the dough onto a lightly floured surface and knead for 5-10 minutes. The dough will be wet initially but will become smooth once worked. When the dough has a smooth skin put it into a lightly oiled bowl. Cover with a clean cloth and leave for two hours.


3.   For the topping, mix the cider with the rye flour and a pinch of sugar to form a thick batter.
4.   Tip the dough out onto a floured surface and shape into a ball. Spread the cider paste over the loaf and sprinkle over the jumbo oats. Place the loaf onto a baking tray lined with parchment.           Leave to prove for one and a half hours.
5.   Preheat the oven to 220C (425F / Gas 7).
6.   Bake for 25 minutes. Reduce the oven temperature to 200C (400F / Gas 6) and bake for a further 10 minutes. The loaf will be golden-brown and should sound hollow when tapped on the base. Leave to cool on a wire rack.


Friday, 29 March 2013

Overnight Sponge and Dough Method part 2


As I mentioned in my previous post about "Overnight Sponge and Dough Method Bread", I changed the ratio of flour and water here. The new formula is much easier to handle than the previous one.
I used wholemeal flour for the 2nd stage of 175g flour. the bread tasted great with a thin crust and very soft and moist crumb. However, there were a few big bubbles inside. Perhaps I couldn't knock all the air out before shaping the loaf.  Well, it's a learning curve. :)

Ingredients
For the sponge
  • 200ml warm water (about 30-35C)
  • 1 level tsp easy-blend yeast (it may also be called "fast-action dried yeast", "instant yeast")
  • 175g strong white bread flour

For the dough
  • 175g strong white bread flour (or other kind of flour e.g. wholemeal, rye etc.) 
  • 1 level tsp fine salt
  • 10ml olive oil

Method
  1. In a big mixing bowl add the warm water and stir in the yeast.  Add the flour, stir it up well with a wooden spoon, cover the bowl and leave overnight.
  2. When you're ready to make your dough, put the second batch of flour (175g) into the yeast batter.  Add salt and olive oil, then mix well.
  3. Lightly flour the work surface and knead the dough for 10 minutes, then cover and leave in a warm place until the dough has doubled in height (2-3 hours).
  4. When the dough is ready, knock it back (pushing it away from the sides with your knuckles) and tip it onto a work surface.
  5. Mould the dough into rugby ball shapes and place them on a baking tray. Cover with a clean tea towel and leave to prove (30 mins - 1 hour). Dust the top of the loaf with a little more flour and slash the top with a sharp knife if you want.
  6. Heat oven to 220C/ fan 200C/ gas 7.
  7. Pour hot water onto the bottom of the oven or into a dish at the bottom of the oven to create steam. 
  8. Bake the bread for 20 mins, then reduce the heat to 190C /fan 170C/gas 5 and continue to bake for 30 mins until the loaf sounds hollow when removed from the oven and tapped on the base. Leave the bread on a wire rack to cool completely

Wednesday, 27 March 2013

Overnight sponge and dough method bread


Recently, I came across a method called "overnight sponge dough." 
I thought that it would be a quicker version of sourdough. Is that right? 
Wikipedia says, "The sponge and dough method is a two-step bread making process: in the first step a sponge is made and allowed to ferment for a period of time, and in the second step the sponge is added to the final dough's ingredients, creating the total formula."  Hmmm....Fascinating stuff. 
So, why this method? "The sponge method is used for 3 different reasons: taste, texture and chemistry.  
The flavour that is created is dependent on the ingredients used and the fermenting yeast. Just like sourdough, the longer the ferment, the greater the taste difference."
So, I thought to myself, why not try this. I did further research and created my recipe.  It was a really sticky job as the dough was wet and difficult to work with.   However, I was happy with the result.   
The bread had a very fine structure, was silky smooth and had a slightly sour flavour compared to the normal bread I make (click here to see) but was much milder than sourdough bread. It also had a very thin crust and a soft and moist interior. I should say there are some issues to deal with like the balance of the quantity of water and flour.  My friend Catherine used 190g flour at the 2nd stage which is a bit more flour than the original recipe. She did really well on her amended version. It's the matter of the ratio of flour and water after all.  Anyway, I've got an idea to make this "Sponge and Dough method bread" easier. I mean to create a dough which is easier to handle.   I'll post the new recipe, so watch this space. 
Meanwhile, here are the ingredients and the method I used for my first sponge and dough method bread.   

Ingredients
For the sponge
  • 225ml warm water (about 30-35C)
  • 1 level tsp easy-blend yeast
  • 175g strong white bread flour

For the dough
  • 175g strong white bread flour
  • 1 level tsp fine salt
  • 25g olive oil

Method
  1. In a big mixing bowl add the warm water and stir in the yeast.  Add the flour, stir it up well with a wooden spoon, cover the bowl and leave overnight.
  2. When you're ready to make your dough, put the second batch of flour (175g) into the yeast batter.  Add salt and olive oil, then mix well.
  3. Lightly flour the work surface and knead the dough for 10 minutes, then cover and leave in a warm place until the dough has doubled in height (about 2 hours).
  4. When the dough is ready, knock it back (pushing it away from the sides with your knuckles) and tip it onto a work surface.
  5. Mould the dough into rugby ball shapes and place them on a baking tray. Cover with a clean tea towel and leave to prove for 30 mins. Dust the top of the loaf with a little more flour and slash the top with a sharp knife if you want.
  6. Heat oven to 220C/ fan 200C/ gas 7.
  7. Pour hot water onto the bottom of the oven or into a dish at the bottom of the oven to create steam. 
  8. Bake the bread for 15 mins, then reduce the heat to 190C /fan 170C/gas 5 and continue to bake for 30 mins until the loaf sounds hollow when removed from the oven and tapped on the base. Leave the bread on a wire rack to cool completely


Tuesday, 5 March 2013

something called "Lemon Bars"


I really enjoyed my bargain lemons and there were the last two remaining in the fruit bowl. 
I was wondering if there was any unusual recipe for my last two lemons and came across something called "lemon bars." Sounds very American to me as we may call these "lemon slices" here in Britain. 
Anyway, these are slices of very tangy lemon filling on top of a biscuit base. That's more or less what they are.  Tray-baked lemon tart ... something like that.  I added lemon zest to the filling to get even more lemony flavour. 

Ingredients

  • 225 g butter, softened 
  • 100 g caster sugar
  • 250 g plain flour
  • 4 eggs
  • 300 g caster sugar
  • 30 g plain flour
  • zest and juice of 2 lemons

Method

  1. Preheat oven to 175 C.
  2. In a medium bowl, blend together softened butter, 250g flour and 100g sugar. Press into the bottom of a 9x13 inch pan.
  3. Bake for 15 to 20 minutes in a preheated oven, or until firm and golden. 
  4. In another bowl, whisk together the remaining 300g sugar and 30g flour. Whisk in the eggs, lemon zest and lemon juice. Pour over the baked crust.
  5. Bake for an additional 20 minutes in the preheated oven. The bars will firm up as they cool. 
  6. Cut into squares when cooled.  


Saturday, 2 March 2013

Really Tangy Upside-down Lemon Cake


I can't resist a bargain .... A bag of unwaxed lemons was half price ... I had to buy them. 
So here is the incredibly tangy upside-down lemon cake with two whole lemons. 
Yes, truly two whole lemons. I used lemon zest in the cake mixture and sliced the lemons and placed them in the bottom of the cake tin which was layered with caramel sauce. 
I love lemon, but it was seriously tangy.   However, somehow, it was quite morish and I really enjoyed it. Should I recommend you to bake it?     
I'm not so sure ... but if you REALLY like a tangy lemony flavour, go for it. 

Ingredients 

  • 200g plain flour
  • 150g sugar 
  • 2 tsp baking powder
  • 150ml milk
  • 50ml vegetable oil  
  • 1 egg
  • zest of 2 lemons
  • 2 sliced lemons
  • for caramel: 3 oz caster sugar + 3 tablespoon water
Method

  1. Place the granulated sugar and 6 Tbsp water into a stainless steel pan.
  2. Stir over a low heat until the sugar has dissolved and there are no granules.
  3. Remove the spoon and increase the heat. (Do NOT stir! Just watch!)
  4. Boil until a golden straw colour and immediately pour into the cake tin. Leave it to cool.
  5. Slice the lemons and place them on top of the caramel layer in the bottom of the cake tin.
  6. Measure out the dry ingredients in a large mixing bowl. Add lemon zest.
  7. Measure milk and oil in a large measuring jug. Add egg and whisk well.
  8. Add the wet mixture into the dry mixture.  Stir until just combined. 
  9. Pour the mixture into the cake tin.
  10. Bake in a preheated (180 C) oven for 20 minutes or until golden brown on top. 
  11. When the cake is baked, leave it for a few minutes then turn it upside-down onto the plate. 

Sunday, 24 February 2013

Golden Syrup Cupcakes


Oops ... No sugar? Ah, but I've got golden syrup in the cupboard.
So, here they are, I made golden syrup cupcakes.  As an experiment, I put everything in a bowl and mixed with an electric hand mixer. Easy does it. :)  The result was surprisingly great. The texture of the cupcakes was really fine. They have an almost velvety like texture and they are very light and moist. They also have the rich sugary flavour of golden syrup.
Ah, I have to mention that I put some chopped prunes which I happened to have in my cupboard.
So these are really "cupboard cupcakes."


Ingredients
  • 6 oz low-fat spread (or butter if you prefer) 
  • 6 oz golden syrup
  • 6 oz SR flour (or Plain flour)
  • 1 tsp baking powder (if you use the Plain flour, increase the BP to 2 tsp)
  • 2 eggs
  • 1 tsp lemon juice
  • 1 Tbsp  Milk
Method
  1. Pre-heat the oven 160-180 °c      
  2. Put all ingredients in the food processer and mix well. Or put all  ingredients in a bowl and mix with  electric hand mixer.
  3. Add more milk if necessary until you achieve the dropping texture  
  4. Pour the mixture into the prepared muffin cases in the muffin baking try.
  5. Bake in the oven for 25-30 minutes
  6. When the cupcakes are baked, let them stand for 5 minutes in the baking tray, then turn them out. 

Monday, 18 February 2013

Chocolate & orange muffins

Chocolate and orange is a good combination. 
These muffins have a quite pronounced flavour of orange, but they don't have any actual orange segments or even juice. Fresh orange zest really gives an aromatic flavour. 
I added chopped white chocolate to compliment the fresh orange flavour. You could add more white chocolate if you wish.

Ingredients 

  • 200g plain flour
  • 150g caster sugar 
  • 25g cocoa powder
  • 2 tsp baking powder
  • ¼ tsp salt
  • 150ml milk
  • 50ml vegetable oil  
  • 1 egg
  • 50g white chocolate chopped
  • zest of 1 orange

Method

  1. Preheat oven to 200 C / Gas 6 and add paper cases to a muffin tray.
  2. Measure out dry ingredients in a large mixing bowl.
  3. Measure milk and oil in a large measuring jug. Add egg and whisk well.
  4. Add the wet mixture (3) into the dry mixture (2).  Stir until just combined. The mixture will be lumpy. Do NOT over mix.     Then, gently fold in chopped white chocolate and zest of orange.
  5. Bake for 20 minutes or until golden brown on top. 


Wednesday, 23 January 2013

Dairy free cranberry and chocolate muffins


No milk in the fridge .... fear not ... you can still make muffins without milk. 
If I say without milk, that doesn't mean you need substitute stuff like soya milk or oat milk.  
You can actually make muffins simply using water instead of milk.   
I recently discovered that I could bake cake without eggs and milk when I tried to make vegan cupcakes. When I found there was no milk in my fridge, I thought to myself I still could make muffins using water like I made vegan cupcakes the other day.  :)
I used an egg as I had some eggs in the fridge. So, these muffins are dairy free but not totally vegan. 
They have a lovely chocolaty flavour and very light.  


Ingredients 

  • 200g plain flour (if you use self raising flour, no need to add baking powder) 
  • 150g sugar
  • 20g cocoa powder
  • 2 tsp baking powder
  • ¼  tsp Salt
  • 100ml water 
  • 60ml vegetable oil
  • 1 egg
  • Vanilla extract
  • 120g fresh cranberries 

Method 

  1. Preheat oven to 200 C / Gas 6 and add paper cases to a muffin tray.
  1. Measure out flour, sugar, baking powder and salt in a large mixing bowl and mix the dried ingredients well.
  1. Measure water and oil in a large measuring jug. Add egg and vanilla, then whisk well.
  1.  Add the wet mixture (3) into the dry mixture (2).  Stir until just combined (mixture will be lumpy).        Do NOT over mix!
  1. Gently fold in cranberries.
  1. Bake for 20 minutes or until golden brown on top.

Sunday, 20 January 2013

Vegan Chocolate Cupcakes


Believe it or not, these are "vegan friendly" cupcakes. I was searching for a cake recipe for my vegan friend and found a recipe which is totally egg-free and dairy-free.   This recipe doesn't require any unusual ingredients. I call this "absolutely cupboard ingredients cake".   I wasn't sure how the cupcakes would turn out as the recipe seemed to be too simple.   However, I was pleasantly surprised by the result.
These cupcakes are really moist, soft, light and full of flavour.   You wouldn't believe these are totally egg and daily free. I made cupcakes, but this recipe would also work as a sponge base for any decorated cake. When you bake it in a cake tin, it just bakes for longer.  
I put crushed walnuts on top before baking them.  Lovely. :)


Ingredients


  • 200g (7 oz) self-raising flour 
  • 200g (7 oz) caster sugar
  • 4 Tbsp cocoa powder
  • 1 tsp baking powder
  • ¼ tsp salt
  • 5 Tbsp vegetable oil
  • 1 tsp vanilla extract
  • 1 tsp lemon juice
  • 250ml (8 floz) water


Method
  1. Preheat oven to 180 C / gas 4. Lightly grease a 13x23cm loaf tin or a 20cm round cake tin.                 If you make cupcakes, prepare muffin cases.  
  2. Sieve together the flour, sugar, cocoa, baking powder and salt. Add oil, vanilla, lemon juice and water. Mix together until smooth.
  3. Pour into prepared tin or muffin cases and bake for 40 minutes for cake tin or 20 minutes for cupcakes. Check it's cooked by inserting a skewer. If it's clean on withdrawl then it's cooked.
  4. Remove from oven and allow to cool.


Friday, 18 January 2013

Apple and cranberry tarte tatin


Yes, this is really red, isn't it?  I didn't use any food colouring at all.
This beautiful ruby red naturally came from cranberries. I stocked up lots of fresh cranberries in my freezer after post-Christmas shopping.   Cranberries did not only add this beautiful colour but also added a lovely tangy flavour to my usual apple tarte tatin.
You can imagine my excitement when I turned it upside down on the plate.   What a wonderful surprise. :) 
Anyway, having warm dessert is a treat on a snowy day like today.

I filled the gaps with frozen cranberries straight from the freezer. My rough-puff pastry looking promising.

It makes a lovely dessert with creme fraiche. 

Ingredients
For the pastry
· 100g/4oz plain flour
· 50g/2oz butter (in a block) salted butter would be better for sharpening the flavour
· 25g/1oz lard (in a block) 
For the caramel
· 175g/6oz granulated sugar 
For the topping
· 3-4 red dessert apples
· some fresh cranberries to fill the gap
To finish
         · 50g/2oz caster sugar and lemon juice
         

Preparation method
1.    First make the pastry. Freeze the butter and lard until very cold.

2.    Measure the flour into a bowl and grate the butter and lard into the flour. Use a knife to coat the butter and lard in the flour. Add 4-5 tbsp cold water and mix to a firm dough until it comes together.

3.    Roll out the pastry on a floured work surface to a rectangle. Fold one third down and then fold the bottom third up and over the top fold. Turn it 90 degrees (a quarter turn) and repeat the rolling and folding. Set aside, covered, in the fridge for 20 minutes. Repeat the rolling, folding and chilling twice more so you have a total of four folds and turns.

4.    Preheat the oven to 220C/425F/Gas 7.

5.    For the caramel, place the granulated sugar and 6 tbsp water into a stainless steel pan. Stir over a low heat until the sugar has dissolved and there are no granules. Remove the spoon and increase the heat. Boil until a golden straw colour and immediately pour into a 23cm/9in fixed-base deep sponge sandwich tin. Don’t let it get too dark or it will be bitter – this is very important!  

6.    For the topping, core the apples, then cut into thick slices. Arrange a layer over the caramel in the tin in a circular pattern – start from the outside of the tin and work inwards. Fill the gaps with cranberries.

7.    Roll out the pastry to a round, slightly bigger than the tin. Cover the apples and tuck the edges of the pastry down around the apples. Make a small cross in the top of the pastry to let the steam out.

8.    Bake for about 40 minutes until the pastry is crisp and golden-brown and the apples are soft.

9.    To finish, before turning the tarte out, tip the juices from the tin into a saucepan. Add the caster sugar and lemon juice and boil until syrupy.

10. Turn the tarte tatin out onto a plate and spoon the syrup over the apples. Serve with cream or crème fraîche.

       Do not wash-up the sauce pan which was used for making caramel. Use the sauce pan to make glaze!  Add sugar, lemon juice and some juices from the tarte tatin to the sauce pan which has leftover hardened caramel. 


Thursday, 17 January 2013

Super Low-fat Chocolate Brownies


Here they are. Very chocolaty and really sticky but, believe it or not, "low-fat" chocolate brownies.
I posted this unbelievable mayonnaise chocolate brownies recipe before but here is a slightly amended version after trying it several times. These chocolate brownies can be made in a round tin and turned out as a cake.
It's also delicious with a drop of creme fraiche, for a dessert. :)


Ingredients
  • 100g dark chocolate , 70% cocoa solids, chopped into small pieces
  • 100g plain flour
  • 30g cocoa powder
  • ½ tsp bicarbonate of soda (or baking powder which I prefer)
  • 120g golden caster sugar
  • 60g light muscovado sugar
  • 1 tsp vanilla extract
  • ½  Tbsp milk and a little drop of lemon juice (approx. ¼ tsp)
  • 1 egg
  • 120g “reduced fat” mayonnaise

Method
  1. Heat oven to 180C/fan 160C/gas 4. Pour enough water into a small pan to one-third fill it. Bring to the boil, then remove the pan from the heat. Put the chopped chocolate into a large bowl that will fit snugly over the pan without touching the water. Sit the pan over the water (still off the heat) and leave the chocolate to melt slowly for a few mins, stirring occasionally until it has melted evenly. Remove the bowl from the pan, then let the chocolate cool slightly.
  2. Meanwhile, lightly oil and base-line a 19cm square cake tin that is 5cm deep. Combine the flour, cocoa and bicarbonate of soda (or baking powder which I prefer). Using a wooden spoon, stir both the sugars into the cooled chocolate with vanilla, milk and tiny drop of lemon juice. Stir in 1 tbsp warm water. Break and beat in the egg, then stir in the mayonnaise just until smooth and glossy. Sift over the flour and cocoa mix, then gently fold in with a spatula without overmixing.
  3. Pour the mixture into the tin, then gently and evenly spread it into the corners. Bake for 30 mins. When a skewer is inserted into the middle, it should come out with just a few moist crumbs sticking to it. If cooked too long, the mix will dry out; not long enough and it can sink. Leave in the tin until completely cold, then loosen the sides with a round-bladed knife. Turn out onto a board, peel off the lining paper and cut into 12 squares.

Sunday, 13 January 2013

very moist dessert cupcakes


These lovely cupcakes are really light, soft, moist and juicy. You can use different fruit like chopped apples, pears etc., but I found mixed berries are just so brilliant. :)  I love these cupcakes with creme fraiche for dessert.  Or decorating them with buttercream would be nice .... but a bit naughty, perhaps ...
I added the recipe for the buttercream in case you fancy it.


Ingredients (approx. 10 cupcakes)
  • 6 oz plain flour  (or self raising flour) 
  • 6 oz caster sugar
  • 6 oz low-fat spread (or butter if you prefer)
  • 2 tsp baking powder (if you use plain flour, but not if you use self raising flour)
  • 2 eggs
  • 1-2 Tbsp milk
  • 1 tsp vanilla extract
  • 120g frozen mixed berries (or fresh ones if you have them) 

Method
  1. Put all ingredients (except the berries) in a bowl and whisk up with an electric whisk. The mixture should have a dropping consistency. Add a bit more milk to get the right consistency.
  2. Fold the berries into the cake mixture very gently not to break the berries.
  3. Pour the mixture into cupcake cases that are placed in the tin.
  4. Bake for about 30 minutes in the preheated oven (180c). 
  5. When the cupcakes are baked, leave then in the tin for a few minutes and then take them out to cool.
  6. Cupcakes are ready to be decorated with butter cream, cream cheese or creme fraiche.  

Basic buttercream icing ingredients  
  • 140g / 5 oz  butter softened 
  • 280g / 10 oz icing sugar 
  • 1-2 Tbsp milk
  • a few drops of food colouring 
Method
  1. Beat the butter in a large bowl until soft. 
  2. Add half of the icing sugar and beat until smooth. Add the remaining icing sugar and one tablespoon of the milk and beat the mixture until creamy and smooth. Beat in the milk, if necessary, to loosen the mixture.
  3. Stir in the food colouring until well combined.


Tuesday, 8 January 2013

"seriously lemony" lemon Drizzle cupcakes

Lots of people are having nasty colds at this time of year. My very good friend had one and she said she would be off work and staying in bed. Poor thing. :(   Fortunately, I'm ok so far, so I decided to make little cupcakes to cheer her up.   These are "seriously lemony" cupcakes which contain lots of vitamin C which, I hope, helps her to fight the cold.  I posted "lemon drizzle muffins" in this blog before, but these are "lemon drizzle cupcakes" ... yes, different. I understand that muffins and cupcakes are different things. Muffins tend to use a liquid form of fat like vegetable oil whereas cupcakes likely require a solid form of fat like butter or margarine. 
So, here are my cupcakes filled with a lot of lemony moisture. Ahhhh, seriously good. 

Ingredients (8-9 cupcakes) 
  • 6 oz plain flour  (or self raising flour)  
  • 6 oz caster sugar
  • 6 oz low-fat spread (or butter if you prefer)
  • 2 tsp baking powder (if you use plain flour)
  • 2 eggs
  • 1-2 Tbsp milk
  • zest of 1 lemon
      For the lemon syrup
  • juice of 1 lemon
  • 2 Tbsp sugar 

Method
  1. Put all ingredients (except the lemon syrup) in a bowl and whisk up with an electric whisk. The mixture should have a dropping consistency. If not add a bit of milk.
  2. Pour the mixture into cupcake cases that are placed in the tin.
  3. Bake for about 30 minutes in the preheated oven (180c). 
  4. When the cupcakes are baked, leave then in the tin for a few minutes and then take them out to cool.
  5. When the cupcakes are still slightly warm, make a few holes in each cupcake and pour the lemon syrup over each one. (about 1-2 tsp each) 
  6. Let them absorb the lemon syrup. 


Monday, 7 January 2013

Roasted vegetable quiche

Making a quiche is not a quick job. Especially if you are making pastry from scratch, it takes a bit of effort. However, I really fancied making home-made quiche as today was one of those wet miserable British days. Certainly, this colourful quiche will cheer anybody up. :) 
I used aubergine as there was a bit left in my fridge, but there were mixed reviews .... I quite enjoyed the soft texture and mellow  flavour of aubergine, but some said it didn't go with the egg mixture. 
So, I may say that aubergine could be replaced with another vegetable like carrots.  
Cherry tomatoes are a must have item for this quiche. They brighten up the dish.  They also have a very sweet and tangy flavour to give extra kick to the quiche. 

Ingredients (for 20cm round loose-bottomed tin) 

  • 1 small onion sliced
  • 120g courgette sliced
  • 3 mushrooms sliced
  • ½ red pepper sliced
  • 120g aubergine sliced
  • 8-10 chetrry tomatoes cut in half
  • 3 cloves of garlic sliced
  • 1 tsp mixed dried herbs
For the egg mixture
  • 2 large eggs
  • 150ml semi-skimmed milk
  • salt and pepper 
  • 1 tsp mixed dried herbs 
 For pastry:
  • 200g plain flour
  • 50g lard
  • 50g butter (If you prefer 100% butter pastry, use 100g butter and ignore the lard)
  • pinch of salt

Method
1.  First make the pastry. Sift the flour into a large bowl. Rub in the butter until the mixture resembles fine crumbs. Sprinkle with 1 tbsp of ice-cold water and mix to form a dough, adding an extra 1 tbsp water, if necessary.

2.  Gather the dough into a ball, then roll it out on a lightly floured surface into a 28 cm circle, about 3 mm thick. Use the pastry to line a loose-bottomed 20cm fluted flan tin, about 3 cm deep. Prick the pastry case all over with a fork, then cover and chill for at least 30 minutes.

3.  Place vegetables on a baking tray and drizzle olive oil. Sprinkle salt, pepper and dried mixed herbs. Bake the vegetables in the preheated (200°C, 400°F, gas mark 6) oven until tender. Then leave them to cool.

4.  Line the chilled pastry case with a piece of greaseproof paper and cover with baking beans. Place on the hot baking tray and bake for 15 minutes. Remove the paper and beans, and continue baking the pastry case for 5 minutes. Brush the bottom of the pastry case with a little of the beaten egg and bake for a further 2 minutes. Remove from the oven, leaving the baking tray inside. Reduce the oven to 190°C (375°F, gas mark 5).

5.  Beat the milk with the eggs. Add the herbs and seasoning to taste. Spread the vegetables in the pastry case. Put cherry tomatoes on top. Pour the egg mixture over the vegetables.

6.  Place the quiche in the oven, on the hot baking tray, and bake for 30–40 minutes or until the filling is set. Leave to cool for at least 10 minutes before serving.


Wednesday, 2 January 2013

Cranberry and apple upside-down cake

Yes, I still have some cranberries which I got when I shopped after Christmas. These bargain cranberries have a really great flavour and very fresh. I used these beauties for my good old upside-down caramel cake. 
The cake looks very cheering on a cold winter day. :) 

Ingredients  (for 19cm round cake tin)

  • 5 oz plain flour or selfraising flour 
  • 5 oz caster sugar
  • 5 oz butter or low-fat spread 
  • 2 teaspoons baking powder (no need if you use selfraising flour)
  • 2 eggs
  • 1 tsp milk 
  • 1 tsp lemon juice
  • 1 tsp vanilla extract
  • 100g cranberries
  • 1 small apple
  • for caramel: 3 oz granulated sugar + 3 tablespoon water

Method

To make the caramel sauce: 

  • Place the granulated sugar and water into a stainless steel pan.
  • Stir over a low heat until the sugar has dissolved and there are no granules.
  • Remove the spoon and increase the heat.
  • Boil until a golden straw colour and immediately pour into a tin. 


  1. Preheat oven to 180 °C.  
  2. Place cranberries and chopped apple in the cake tin when the caramel is cool and set.
  3. Put all ingredients (butter, sugar, flour, lemon juice, vanilla, eggs and milk) in a bowl.
  4. Mix with electric whisk.  
  5. Pour the mixture on top of the cranberries and chopped apple.
  6. Bake in a pre-heated oven for about 30-40 minutes. When the cake cools down turn the cake tin upside down.