Saturday, 7 May 2022

Ginger and Cream cheese Cupcakes


I love ginger! This is a bit more than well-loved gingerbread as I used freshly grated "fresh ginger" for the cream cheese frosting. It gives more kick if you like the gingery flavour like I do. However, you can use the ginger syrup from the jar if you prefer a milder taste. it's up to you! :) 
These little beauties are a lovely teatime treat. 

Ingredients


  • 100g butter
  • 100g light brown soft sugar
  • 125g golden syrup
  • 50g treacle (or molasses)
  • 150ml milk
  • 1 large egg
  • 20g chopped ginger from a jar of stem ginger in syrup
  • 225g self-raising flour
  • 1 tsp baking powder
  • 2 tsp ground ginger
  • 1½ tsp ground cinnamon

For the icing

  • 60g unsalted butter, at room temperature
  • 175g icing sugar
  • 1 tbsp ginger syrup from a jar of stem ginger in syrup (I used fresh grated from which I squeezed the juice)
  • 60g mascarpone (or cream cheese)
  • Crystallised ginger, roughly chopped, to decorate (optional)


Method


  1. Preheat the oven to 180ºC and line a 12-hole muffin tin with muffin cases.
  2. Combine the butter, sugar, golden syrup and treacle in a small saucepan and heat until the butter has completely melted. Allow to cool for a few minutes, then stir in the milk and beat in the egg. Stir in the chopped ginger.
  3. Place the flour, baking powder and spices into a large mixing bowl and mix to combine. Make a well in the centre and pour in the wet ingredients, then stir together, using a balloon whisk, until smooth.
  4. Divide the mixture between the cake cases. Bake for 15-17 minutes, or until nicely risen and a skewer inserted comes out clean. Allow to cool completely before icing.
  5. To make the icing, place all the ingredients into a mixing bowl or the bowl of a stand mixer. Beat for a few minutes until smooth. Pipe or use a teaspoon to decorate each cake and top with crystallised ginger, if liked.


Sunday, 1 May 2022

Japanese Cheesecake


This Japanese cheesecake is nothing like any other cheesecake, but is very familiar to me. I was once hooked on this when I was a teenager. I had never thought in a million years that I could bake this, but here it is, I CAN.  It's a rather fiddly process as it is baked in the oven with a water-bath, but it's worth it. 

It's light, fluffy and yet very moist. Awww, memory of Japan! 

Ingredients

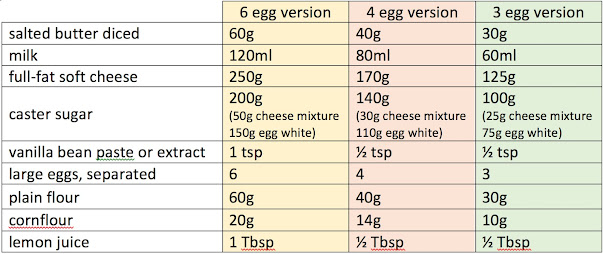
40g salted butter diced 

80ml milk

170g full-fat soft cheese

140g caster sugar (30g for cheese mixture, 110g for egg white)

1/2 tsp vanilla extract

4 large eggs separated 

40g plain flour 

14g cornflour

1/2 tbsp lemon juice 


Method

1.     Preheat the oven to 180°C, fan 160°C. Grease and line a deep 20cm diameter fixed-base tin, making sure that the baking paper forms a collar that stands at least 6cm above the rim of the tin. If you use a loose-base tin, wrap the tin with tinfoil so that the water won't get into the tin.
 
2.     Put the butter, milk, soft cheese and 30g of the sugar in a microwave-safe bowl and place it in the microwave. Set for 1 minute, but check every 10 seconds and whisk the mixture until the butter has melted and you have a smooth mixture. Stir through the vanilla, remove from the microwave and let the mixture cool slightly.
 
3.     Whisk the egg yolks together, then gently whisk these into the cheese mixture. Sift the flour and cornflour together, then gently whisk through the egg and soft cheese mixture, adding the lemon juice.
 
4.     Put the egg whites into a free-standing mixer and whisk to soft peaks. Gradually add the remaining 110g sugar, whisking until you have a meringue-like mixture. Add a third of the egg white mixture to the soft cheese mixture and slowly fold through until you have no lumps of meringue. Repeat with another third of the egg whites. Now add the whisked mixture to the egg whites left in the mixer, folding until combined. Pour into the lined tin.
 
5.     Sit the cheesecake tin in a large roasting tin and pour in boiling water to reach halfway up the sides. Carefully transfer to the oven and bake for 20 minutes, then reduce the oven temperature to 160°C, fan 140°C and bake for a further 30 minutes. The cheesecake should be double its original height and set, but still with a slight wobble. Turn off the oven but leave the cheesecake inside for 30 minutes. Remove from the oven and leave to cool completely in the tin. 


Tuesday, 16 June 2020

Non-Yeast Easy Pizza


Since the Lockdown started, one of the difficult things is getting yeast!
Supermarkets don't seem to be able to catch up with the home-bakers' demands. I normally bake pizza with yeast dough, but don't have any yeast in my cupboard. 
So I baked without it. Basically, it's a kind of soda bread dough but it has a light fluffy texture.  Enjoy your pizza and stay safe. :) 


Non-Yeast Easy Pizza (for two hungry people)

For the toppings
  • Tomato paste
  • 200g/7oz mozzarella mozzarella (or any other cheese), torn into pieces, for topping
  • Fresh basil
  • Chorizo (optional)
  • Mushrooms (Optional)
For the dough
  • 200g self-raising flour, plus extra for dusting
  • ½ tsp baking powder
  • 1 tsp dried mixed herbs
  • ¼ tsp salt
  • 200g/10½oz natural yoghurt 
  • 10ml olive oil, plus drizzling

Method
  1. Preheat the oven to 220C/200C Fan and put two baking trays in to heat.
  2. To make the dough, combine the flour, baking powder, herbs and salt in a bowl and make a well in the middle. Pour in the yoghurt and olive oil and stir with a fork to combine. When the mixture forms a rough dough, turn out onto a lightly floured work surface and knead to form a smooth ball.
  3. Carefully remove the hot baking trays from the oven and lay the pizza bases on top. Bake for 3-4 minutes until beginning to rise then remove from the oven.
  4. Turn the pizza bases over and bake another 3 minutes.
  5. Top with the tomato paste. Scatter the mozzarella over the top. Add your chosen toppings. Season with black pepper, sprinkle over a pinch of herbs and drizzle some olive oil. Then return to the oven. Bake for 5 minutes until the bases are crisp and the cheese is bubbling.
  6. Serve with sprinkled fresh basil.


Sunday, 17 December 2017

Very Merry Christmassy Muffins


This is a very easy and satisfying muffin recipe which you can enjoy anytime of the year.
However, somehow, the flavour of almond, orange and dried fruit creates a very Christmassy aroma.
It's a great treat coming back from a brisk wintry walk to have these with a warm drink of coffee, tea or even mulled wine. :)
These are best as they are still warm. But they can be reheated by oven or microwave.


Ingredients (for 10 muffins)   
  • 1 egg
  • 60ml of veg oil 
  • 125ml of milk
  • 100g caster sugar 
  • 200g self-raising flour 
  • 75g dried cranberries 
  • 75g raisins
  • 50g of mixed peel 
  • Zest of half an orange
  • 1/2 tsp of almond extract 
  • A handful of flaked almonds 

Method
  1. Preheat the oven to 180°C and line a muffin tray with 10 cases.
  2. Whisk the egg until it is well combined, then add milk, oil and sugar and continue to whisk.
  3. Using a sieve, add the self-raising flour, cranberries, raisins, mixed peel, orange zest and almond extract to the egg and gently mix in.
  4. Pour the batter into cases and top with some flaked almonds. Then bake for around 20 minutes until they have risen and are lightly golden.
  5. Allow them to cool and then dust the top of the muffins with some icing sugar. 


Monday, 11 December 2017

Incredibly Rich Chocolate Tart


Yes, this is a very rich indulgent chocolate tart to impress your guests.
However, it's so easy to make. You can even take a short cut using shop bought pastry.
Sprinkle sea salt to give the tart an extra special intense flavour.

Just enjoy. ;)


Ingredients (for 20cm pie dish)

For the pastry 
  • 150g plain flour, plus extra for dusting
  • 125g chilled unsalted butter, cubed
  • 25g caster sugar
  • 1 tbsp water

·    
For the chocolate filling

  • 200 ml double cream
  • 1tsp caster sugar 
  • A pinch of fine sea salt 
  • 25g unsalted butter, softened 
  • 150g 70% cocoa chocolate, broken into small pieces 
  • 30ml whole milk
Some sea salt flakes to decorate 


Making the pastry:

  1. In a large bowl, rub together the flour and butter with your fingertips until it resembles breadcrumbs (or use a food processor). Stir in the sugar. Add the water and work the mixture with a fork, bringing it together to form a soft dough. 

  2. Turn out on to a lightly-floured work surface and shape into a disc. Wrap in cling film. Chill for 1 hour. 

  3. On a lightly-floured surface, roll out the chilled dough until 5mm (1/4in) thick. Carefully transfer to a 20cm (8in) tart tin. Press the dough into the tin, trim the edges and patch up any holes with excess dough. Chill for 30 mins. 

  4. Preheat the oven to 180°C, fan 160°C. 

  5. Line the tart shell with foil and fill with blind baking weights or dried beans. Bake for 20 minutes, remove the weights and foil, and bake for a further five minutes. Leave the pastry to cool completely.

Making the chocolate filling:
  1. Put the cream, sugar and salt in a pan and bring to the boil. Remove as soon as the mixture boils up. Off the heat, add the butter and chocolate. Stir until blended.
  2. Take a couple of minutes to cool the mixture, then stir in the milk. Keep stirring till shiny. Pour into the tart shell and leave at room temperature for 2 hours to set.
  3. Sprinkle some sea salt flakes. 


Tuesday, 21 November 2017

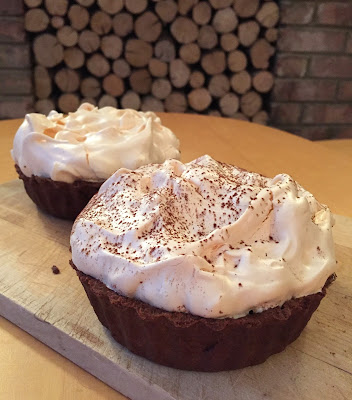
Chocolate Meringue Pie


This is my updated classic Chocolate Meringue Pie.
I very much enjoyed the chocolate meringue pie which my friend baked as the finale of her Sunday lunch that she invited me to. For me, it was the first time that I tasted the velvety chocolate filling with a crunchy but "melting in your mouth" meringue combination. I just loved it.
Apparently, that was her mum's classic "Sunday dinner pudding" which she often requested when she was little. I realise how clever the recipe is as whole eggs are used in different components of one pudding.
No waste.
I was inspired by this lovely flavour and texture combo, so I created this even more chocolaty pie.
Chocolate pastry gives the pie a more sophisticated flair.

Ingredients

Chocolate Pastry: 
  • 120 g plain flour
  • 15 g cocoa powder
  • 20 g icing sugar
  • pinch of salt
  • 60 g butter, diced
  • 4–5 teaspoons cold water 
Chocolate Filling:
  • 3 egg yolks 
  • 110 g caster sugar 
  • 3 Tablespoons cocoa powder, sifted
  • 1 Tablespoon cornflour
  • pinch of salt
  • 300ml milk
  • 1 teaspoon vanilla extract
  • Orange zest (optional)
Meringue:
  • 3 egg whites
  • 150g caster sugar
  • 1 teaspoon lemon juice
  • 1 teaspoon cornflour 
  • 40 g dark chocolate, grated, plus extra to decorate (optional)

Make the pastry
  1. Add the flour, cocoa, sugar and butter to a large bowl, then rub in with your fingertips or an electric mixer until you have fine crumbs. 
  2. Mix in enough water to form a soft but not sticky dough. Roll out on a floured surface to fit a fluted loose-bottomed tart tin, 20 cm in diameter, 5 cm deep. (I used two small tart dishes: 13 cm in diameter, 3.5 cm deep)
  3. Prick the base with a fork and chill for 15 minutes. Bake the tart blind for 10 minutes in a preheated 180°C fan oven. Remove the paper and beans and bake for a further 5 minutes.

Make the Chocolate Filling: 
  1. Whisk the egg yolks, sugar, cocoa powder and cornflour together in a large bowl. 
  2. Pour the milk into a saucepan and bring to the boil. 
  3. Gradually whisk the hot milk into the egg yolk mixture and then pour it back into the saucepan, whisking constantly until it thickens. Stir in the vanilla, (and zest of orange if you prefer) then pour into the tart case.

Make the Meringue
  1. Whisk the egg whites and lemon juice until stiff, then gradually whisk in the remaining sugar until it has all been added. 
  2. Add cornflour and keep whisking until the meringue is very thick. 
  3. Then fold in the grated chocolate for a chocolatey meringue (optional).

Spoon the meringue over the pie, shape into swirls, then bake at 140°C, for 40 minutes until the meringue is slightly golden and crispy on top. 
Cool slowly in the oven by leaving the oven door ajar at least for one hour. 

Before serving, sprinkle with grated chocolate to decorate.


Saturday, 4 November 2017

栗どら焼き Japanese mini pancakes with Sweet Chestnut Puree filling


It was such fun to make chestnut puree from the sweet chestnuts that I collected from the local woods. Although it was a bit of an effort to make smooth puree it was absolutely worth it.
So, I was wondering what else I could make with my lovely chestnut puree apart from Mont Blanc.
This year, I made dairy-free puree, so it's basically Japanese 栗あん (kiri-ann)or 栗きんとん(kuru-kinton) after all. Why not make a little 栗どら焼き for fun. どら焼き are mini pancakes with aduki puree filling. But chestnut puree filling is also very popular especially in autumn in Japan. It's a seasonal treat.  They are lovely little things to eat with some Japanese green tea.


Ingredients for mini pancakes (about 20 pancakes)

  • 1 cup self raising flour
  • 1/2 teaspoon baking powder
  • 1 cup milk
  • 1 teaspoon sugar
  • 1 egg
  • 1 teaspoon vegetable oil
Method
  1. Put all the ingredients in a jug and mix well.
  2. Heat the frying pan with a little oil and make mini pancakes.
  3. Cool the pancakes on the rack.
  4. When they are cooled, sandwich the 2 pancakes with the chestnut puree filling.
Please see the recipe for making sweet chestnut puree on the "Mini Mont Blanc" post. 


Tuesday, 31 October 2017

Mini Mont Blanc


I love Autumn.
Put my wellington boots on and find treasures in the woods.
The sweet chestnuts that what I was after.  Crunch, crunch... stamping the autumn leaves and going further in the woods to find the treasures.
I'm so lucky to live near such a beautiful nature reserve and yet be so close to London.
Once again, I managed to make the beautifully smooth chestnut puree and made "Petits Mont Blancs" Chestnut puree and cream on the Meringue nest.
Chestnuts are very popular in savoury dishes in the UK, but you won't be disappointed with this sweet treat.

Making Sweet Chestnut Puree 
  1. Cut a cross in the chestnut shell.
  2. Pre-heat your oven to 200C and place a roasting dish or oven tray inside. 

  3. Pop the chestnuts into a saucepan of water and bring it up to the boil. 
  4. Once it is boiling, start your timer for 2 
minutes. At the end of that time, drain the water off the chestnuts and tip the still steaming chestnuts onto the hot 
oven tray in the oven. 

  5. Leave the chestnuts in the oven for 7 minutes.
  6. While the nuts are roasting, prepare a large bowl and put a tea towel inside the bowl. 

  7. Toss the nuts inside the tea towel in the bowl. This will keep the nuts warm as you peel them. 
It’s easier to peel them when they are warm.
  8. Pull one nut out at a time from under the towel and pull the shell and fluffy inner skin away from the kernel. 
Keep going until you’re all done. 
If you are making puree, the shape of the chestnut doesn’t matter. So, use a teaspoon and scoop out the flesh.
The hard work is done. Now the next bit is much easier.  
For chestnut puree, you will need;
  • 400g chestnuts (unshelled weight)
  • 200g sugar

  • enough water to cover the chestnuts in the sauce pan
  • 1 vanilla bean (or 1 tsp Vanilla paste)
Method:
  1. Chop the chestnuts roughly then place in a saucepan with sugar, vanilla and just enough water to cover the chestnuts. Bring to a simmer so 
that all the sugar dissolves and continue to heat for about 20 minutes. 

  2. Remove the vanilla bean. Blitz the chestnuts with a hand blender until they become a smooth paste.

Making 9 meringues 

   3 medium egg whites (at room temperature)   
   1 tsp of lemon juice 
   170 g (6oz) caster sugar 
   1 tsp cornflour 

** Please see my Easy Mini Meringue recipe for more meringues.

Method

  1. Preheat the oven to 130°C, (fan 110°C). Using an 8cm (3 ¼ in) Mark out 9 circles on a baking parchment.
  2. Get a really clean medium sized bowl. If it is not spotlessly clean, it will mean that the egg whites don’t whip up properly.
  3. Tip the egg whites into the bowl, squeeze the lemon juice in and then whisk them to a medium peak. To test, lift the whisk out of the meringue with some of the white foam on the end.
  4. Next add a spoonful of the sugar to the meringue and whisk really hard until all of the sugar has ‘dissolved’ and the mixture starts to look a bit shiny. Then add the remaining sugar gradually, while whisking all the time, until the mixture becomes really shiny and very stiff.
  5. If you perform the whisk trick at this time, the peak will be almost straight up in the air.
  6. Finally, whisk in the cornflour for a second or two until smooth. This gives the meringue a marshmallow texture inside with a crisp outside.
  7. You can then dollop blobs of the mixture onto each of the 9 circles on the paper and spread each one out to the circle edge with the back of a spoon. You could use a star nozzle in a piping bag and fill it with the meringue mixture. Then, starting in the centre of each circle, holding the piping bag vertically and squeezing it gently as you go, go round and round until the entire circle is filled to give a pretty flat rose shape. When you come to the end of the rose shape, keep the bag moving but stop squeezing it. This will give a neat ‘end’ to the rose. Repeat with the rest of the mix.
  8. Bake in the oven for at least 40 minutes. Cool in the oven with the door ajar.   I leave them in the oven for a couple of hours to cool them completely. (If your meringues crack or became too brown, just turn the oven down by 10°C or so.) Once the meringues are ready, remove them from the oven. 
Now, finally the fun bits.
Assemble the meringues with the chestnut puree and fresh whipped cream.
Enjoy!


Here is the cupcake version of Mini Mont Blanc.